この記事はiOS2 Advent Calendar 2017の9日目の記事です。
開発中やリリース前に、手動での動作確認を行うことは多いと思います。
弊社では、リリースの前にテスト配布を行い、他のエンジニアメンバーや 担当のデザイナー、プロジェクトマネージャーに動作確認をしてもらう体制を取っています。
そしてその際に、”特定の条件で発生する状態”の確認が必要なことは稀に存在します。
例えば、以下のような場面です。
- インストールから○回起動でダイアログを表示をチェックしたい
- とある設定データの値が存在しない状態をチェックしたい
これらのパターンはアプリを再インストールしてもらうことで実現が可能ですが、 再インストールに多少の時間がかかってしまうのが勿体無いです。
また、KeyChainなどで特定のデータを取り扱っている場合は アプリをアンインストールしても、データがDB側に存在し DBから個別に削除する必要があるといったパターンもあります。
その際に、バージョンで削除用の処理を埋め込んだり、 複数台ある端末の特定のIDを個別に、手動で対応するのは現実的ではないですし 時間やコミュニケーションコストが掛かってしまいます。
例え開発者だけだったとしても、都度データを削除するのは面倒ですよね
そこで弊社ではテスト配布版のみ「秘密のアクション」という社内向けの機能を実装しています。
今回は実際のコードと共に機能の紹介をしたいと思います。
テスト版でのみ表示する画面を用意
まず、追加する機能へアクセスするための機能一覧画面が必要です。
Other Swift Flagsを設定し、テスト環境でのみ表示するようにすると良いです。
弊社ではDEBUGとTEST環境でのみ、タイトルロゴを長押しで表示するようにしています。
class HomeViewController: UIViewController {
    override func viewDidLoad() {
        #if DEBUG || TEST
            let titleViewGesture = UILongPressGestureRecognizer(target: self, action: #selector(HomeViewController.longTapTitleView))
            titleViewGesture.minimumPressDuration = 0.5
            logoImageview.addGestureRecognizer(titleViewGesture)
            logoImageview.isUserInteractionEnabled = true
        #endif
    }
...

    @objc private func longTapTitleView() {
        let nextViewController = InhouseViewController()
        let nextNavigationController = navigationController(rootViewController: nextViewController)
        present(nextNavigationController, animated: true, completion: nil)
    }
}
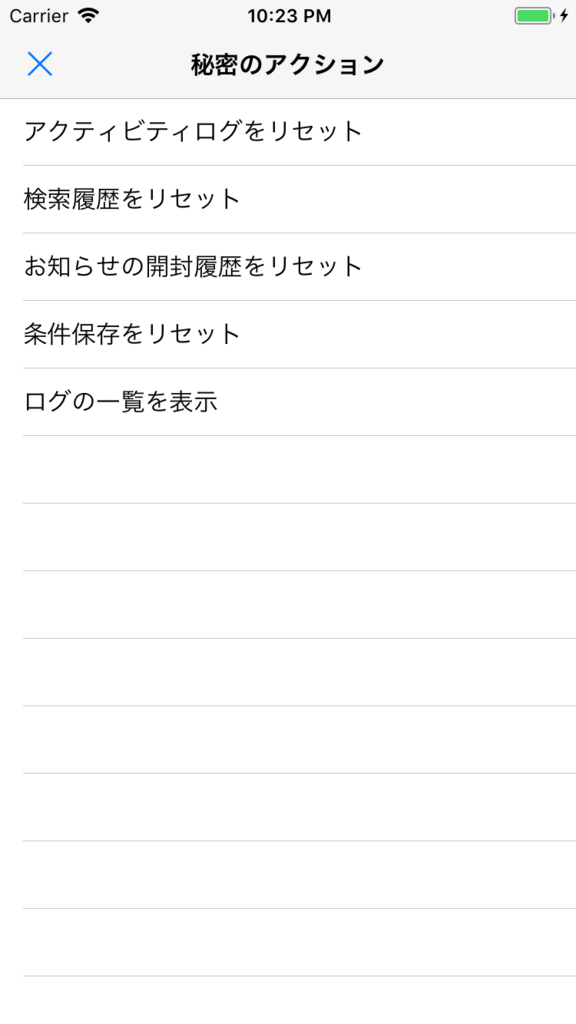
以下のようなシンプルなテーブルビューを用意しています。

データ削除/追加 機能
前述の通り、特定の状態でのみ動作する機能を確認するために 関連するデータを削除する必要があります。
上のスクリーンショットにもありますが、4つの項目にリセット機能を設けています。
これらの項目はEnumで管理しています。
import Foundation

enum InhouseActionType {
    case none
    case reset(ResetActionType)
    case .log

    enum ResetActionType {
        case activityLog, readNotification
        case resentSearchCondition, savedSearchCondition
    }

    var cases: [InhouseActionType] {
        return [.reset(.activityLog), .reset(.readNotification), .reset(.resentSearchCondition), .reset(.savedSearchCondition), .log]
    }

    var displayName: String {
        switch self {
        case .reset(.activityLog): return "アクティビティログ"
        case .reset(.readNotification): return "検索履歴"
        case .reset(.resentSearchCondition): return "お知らせの開封履歴"
        case .reset(.savedSearchCondition): return "条件保存"
        case .log:  return "ログ"
        default: return ""
        }
    }

    var cellText: String {
        switch self {
        case .reset: return "\(self.displayName)をリセット"
        case .log: return "(self.displayName)の一覧を表示"
        default: return ""
        }
    }

    func run() {
        switch self {
        case .reset(.activityLog): /* resetFunction() */
        case .reset(.readNotification): /* resetFunction() */
        case .reset(.resentSearchCondition): /* resetFunction() */
        case .reset(.savedSearchCondition): /* resetFunction() */
        default: break
        }
    }
}
社内向けの機能であり、UIに装飾は必要ないので
機能一覧画面ではInhouseActionType取り扱うだけです。
import UIKit

final class InhouseViewController: UIViewController {

    private var inhouseActionType: InhouseActionType = .none

    private let tableView: UITableView = {
        let tableView = UITableView()
        tableView.register(UITableViewCell.self, forCellReuseIdentifier: "InhouseTableViewCell")
        tableView.alwaysBounceVertical = false
        tableView.rowHeight = 44
        return tableView
    }()

    override func viewDidLoad() {
        super.viewDidLoad()
        setupUI()
    }
}


// MARK: - Private Methods
extension InhouseViewController {
    private func setupUI() {
        navigationItem.title = "秘密のアクション"
        navigationItem.backBarButtonItem = UIBarButtonItem(title: "戻る", style: .plain, target: self, action: nil)

        tableView.dataSource = self
        tableView.delegate = self
        view.addSubview(tableView)
        tableView.translatesAutoresizingMaskIntoConstraints = false
        tableView.topAnchor.constraint(equalTo: topLayoutGuide.bottomAnchor).isActive = true
        tableView.leadingAnchor.constraint(equalTo: view.leadingAnchor).isActive = true
        tableView.trailingAnchor.constraint(equalTo: view.trailingAnchor).isActive = true
        tableView.bottomAnchor.constraint(equalTo: bottomLayoutGuide.topAnchor).isActive = true
    }

    private func displayAlertView(inhouseAction: InhouseActionType) {
        let alertController = UIAlertController(title: "秘密のアクション", message: "\(inhouseAction.cellText)しますか?", preferredStyle: .alert)
        let cancelAction = UIAlertAction(title: "いいえ", style: .default, handler: nil)
        let successAction = UIAlertAction(title: "はい", style: .default) { _ in
            inhouseAction.run()
        }
        alertController.addAction(cancelAction)
        alertController.addAction(successAction)
        present(alertController, animated: true, completion: nil)
    }
}

// MARK: - UITableViewDataSource
extension InhouseViewController: UITableViewDataSource {
    func tableView(_ tableView: UITableView, numberOfRowsInSection section: Int) -> Int {
        return inhouseActionType.cases.count
    }

    func tableView(_ tableView: UITableView, cellForRowAt indexPath: IndexPath) -> UITableViewCell {
        guard let cell = tableView.dequeueReusableCell(withIdentifier: "InhouseTableViewCell") else {
            fatalError("InhouseTableViewCell is not found.")
        }
        let inhouseAction = inhouseActionType.cases[indexPath.row]
        cell.textLabel?.text = inhouseAction.cellText
        return cell
    }
}

// MARK: - UITableViewDelegate
extension InhouseViewController: UITableViewDelegate {
    func tableView(_ tableView: UITableView, didSelectRowAt indexPath: IndexPath) {
        let inhouseAction = inhouseActionType.cases[indexPath.row]
        switch inhouseAction {
        case .log: displayLogListTableView()
        default: displayAlertView(inhouseAction: inhouseAction)
        }
    }
}
ここで一つポイントなのは、アラートビューを挟んであげることです。
誤タップ防止にも繋がりますし、社内向けの機能とはいえ削除機能なので
ワンクッション設けることをおすすめします。
気をつけたいこと
API経由での削除機能に限り、気をつけるべき点が一つあります。
それは、万が一本番APIへ接続した場合に、削除処理を行わないようにすることです。
稀に、テスト版で本番APIに接続するということもあるかと思います。
やはり、本番データを操作してしまうと思わぬ事故が発生しかねないので
しっかりとAPI側でフィルタリングしてあげましょう。
ログの可視化
社内向けの動作確認の中でもう一つあるとよい機能があります。
それはログを画面に表示してあげることです。
例えば、以下のような場面があると思います。
- 行動ログを埋め込むタイミングが正しいか不安
- エラーが起きた際に具体的な内容を確認したい
行動ログを埋め込む際に、別の機能のライフサイクルの関係で 意図したタイミングで送信できていなかったということがあるかもしれません。
また、行動ログを埋め込みを開発者のみしか確認できないのは誤設置のリスクもあります。
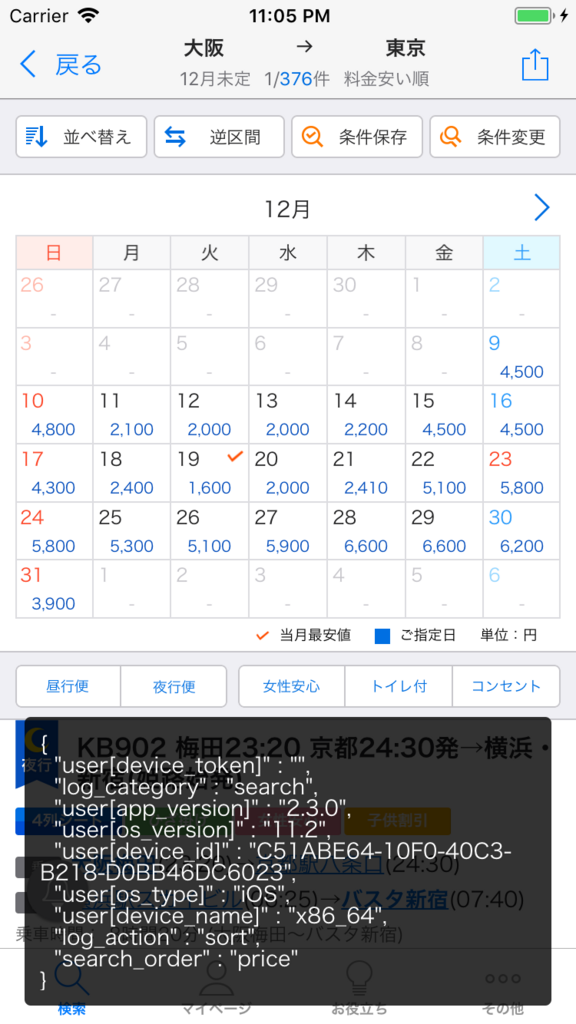
そのようなことを防ぐためにログを送信するタイミングでToastを表示しています。

このように、操作のタイミングで送信する行動ログを3秒間だけ表示します。
実際のコードは以下になります。
import UIKit

final class ToastView: UIView {

    static let shared = ToastView()

    private(set) var logs = [(body: String, createdAt: String)]()

    /// 表示秒数
    private let displayDurationInSeconds: Double = 3.0
    /// 表示/非表示時のアニメーションの秒数
    private let fadeInOutDurationInSeconds: Double = 0.4
    /// 表示/非表示時のアニメーションのタイプ
    private let transition: UIViewAnimationOptions = .transitionCrossDissolve
    /// 非表示用ののタイマー
    private var hideTimer = Timer()

    private func startTimer() {
        hideTimer = Timer(timeInterval: displayDurationInSeconds, target: self, selector: #selector(hideView(_:)), userInfo: nil, repeats: false)
        let runLoop: RunLoop = .current
        runLoop.add(hideTimer, forMode: .defaultRunLoopMode)
    }

    /// Toastを非表示にする
    @objc internal func hideView(_ timer: Timer) {
        if timer.isValid {
            timer.invalidate()
        }

        UIView.transition(with: self, duration: fadeInOutDurationInSeconds, options: transition, animations: nil) {
            if $0 {
                self.removeFromSuperview()
            }
        }
        isHidden = true
    }

    /// Toastを表示する
    func show(text: String, backgroundColor: UIColor = UIColor.black.withAlphaComponent(0.8)) {
        guard let keyWindow = UIApplication.shared.keyWindow, let targetView = keyWindow.rootViewController?.view else { return }

        let offset = CGPoint(x: 8, y: 8)
        let frame = CGRect(x: keyWindow.frame.origin.x + offset.x, y: keyWindow.frame.origin.y + offset.y, width: keyWindow.frame.size.width - offset.x, height: keyWindow.frame.size.height - offset.y)
        let toast = ToastView(frame: frame)
        toast.translatesAutoresizingMaskIntoConstraints = false

        let backgroundView = UIView(frame: CGRect(x: 0, y: 0, width: toast.frame.size.width, height: toast.frame.size.height))
        backgroundView.translatesAutoresizingMaskIntoConstraints = false
        backgroundView.backgroundColor = backgroundColor
        backgroundView.layer.cornerRadius = 4

        let textLabel = UILabel(frame: CGRect(x: 0, y: 0, width: toast.frame.size.width, height: toast.frame.size.height))
        textLabel.translatesAutoresizingMaskIntoConstraints = false
        textLabel.font = UIFont.systemFont(ofSize: 14)
        textLabel.text = text
        textLabel.numberOfLines = 0
        textLabel.sizeToFit()
        textLabel.textColor = UIColor.white
        textLabel.textAlignment = .left

        backgroundView.addSubview(textLabel)
        toast.addSubview(backgroundView)

        targetView.addSubview(toast)

        let constraints = [
            NSLayoutConstraint(item: toast, attribute: .bottom, relatedBy: .equal, toItem: backgroundView, attribute: .bottom, multiplier: 1.0, constant: 0.0),
            NSLayoutConstraint(item: toast, attribute: .top, relatedBy: .equal, toItem: backgroundView, attribute: .top, multiplier: 1.0, constant: 0.0),
            NSLayoutConstraint(item: toast, attribute: .leading, relatedBy: .equal, toItem: backgroundView, attribute: .leading, multiplier: 1.0, constant: 0.0),
            NSLayoutConstraint(item: toast, attribute: .trailing, relatedBy: .equal, toItem: backgroundView, attribute: .trailing, multiplier: 1.0, constant: 0.0),
            NSLayoutConstraint(item: backgroundView, attribute: .bottom, relatedBy: .equal, toItem: textLabel, attribute: .bottom, multiplier: 1.0, constant: 10.0),
            NSLayoutConstraint(item: backgroundView, attribute: .top, relatedBy: .equal, toItem: textLabel, attribute: .top, multiplier: 1.0, constant: -10.0),
            NSLayoutConstraint(item: backgroundView, attribute: .leading, relatedBy: .equal, toItem: textLabel, attribute: .leading, multiplier: 1.0, constant: -10.0),
            NSLayoutConstraint(item: backgroundView, attribute: .trailing, relatedBy: .equal, toItem: textLabel, attribute: .trailing, multiplier: 1.0, constant: 10.0),
            NSLayoutConstraint(item: toast, attribute: .bottom, relatedBy: .equal, toItem: targetView, attribute: .bottomMargin, multiplier: 1.0, constant: -12.0),
            NSLayoutConstraint(item: toast, attribute: .leading, relatedBy: .equal, toItem: targetView, attribute: .leadingMargin, multiplier: 1.0, constant: 0.0),
            NSLayoutConstraint(item: toast, attribute: .trailing, relatedBy: .equal, toItem: targetView, attribute: .trailingMargin, multiplier: 1.0, constant: 0.0),
        ]
        NSLayoutConstraint.activate(constraints)

        targetView.layoutIfNeeded()
        toast.alpha = 0

        logs.append((body: text, createdAt: now()))

        UIView.animate(withDuration: fadeInOutDurationInSeconds, delay: 0, options: transition, animations: {
            toast.alpha = 1
        }, completion: { _ in
            toast.startTimer()
        })
    }

    private func now() -> String {
        let now = Date()
        let formatter = DateFormatter()
        formatter.dateFormat = "yyyy/MM/dd HH:mm:ss"
        return formatter.string(from: now)
    }
}
ここでポイントなのはToastを表示する際に、背景色を設定できるようにしておくところです。
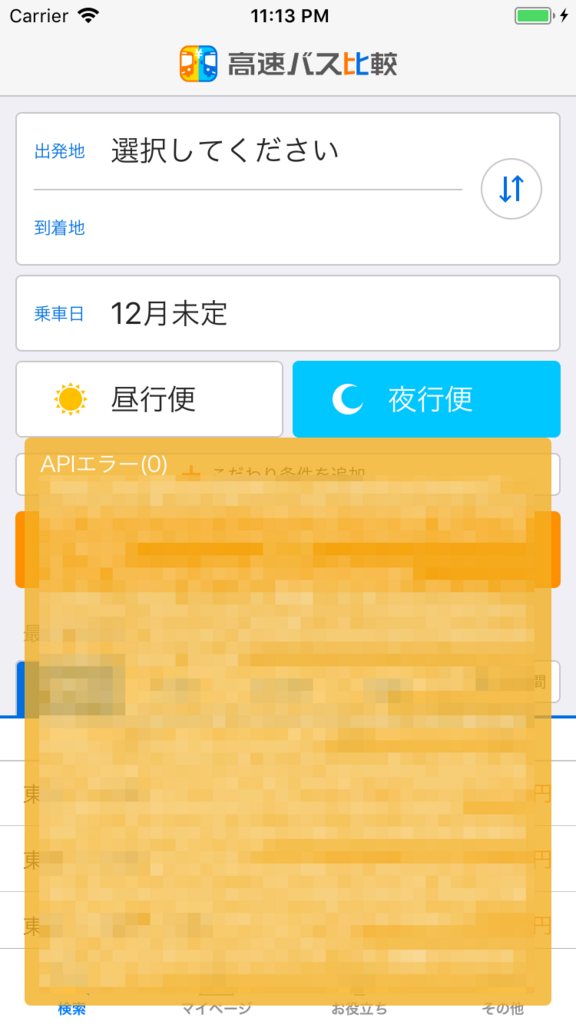
上のスクリーンショットでは行動ログのJSONを表示していますが、 弊社ではその他にもエラー等を表示させています。

背景色を変更することで、表示したログのカテゴリがわかりやすくなります。
画面上に表示することで、エンジニア以外の方がエラーなどに遭遇した場合でも 実際のログを共有してもらいやすくなり、修正等の対応がしやすくなります。
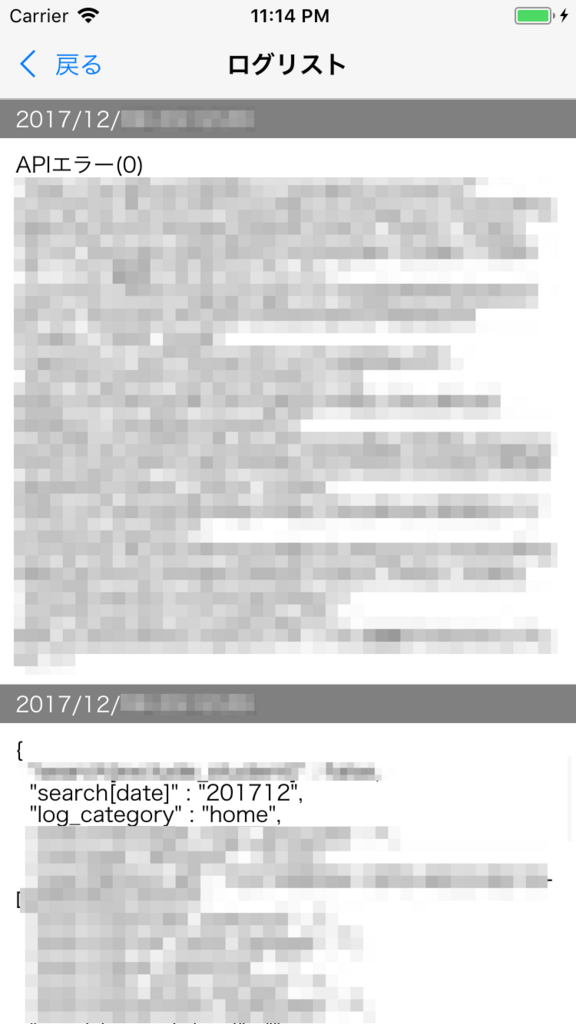
コードをみてお気づきの方もいるかと思いますが、ログのデータを日時とともに保持しており、これらのログは一覧画面から確認できるようにしています。

import UIKit

final class ToastViewController: UIViewController {

    private let tableView: UITableView = {
        let tableView = UITableView()
        tableView.register(ToastTableViewCell.self, forCellReuseIdentifier: ToastTableViewCell.className)
        tableView.alwaysBounceVertical = false
        tableView.rowHeight = UITableViewAutomaticDimension
        tableView.estimatedRowHeight = 44
        tableView.separatorInset = .zero
        if #available(iOS 11.0, *) {
            tableView.contentInsetAdjustmentBehavior = .never
        }
        return tableView
    }()

    override func viewDidLoad() {
        super.viewDidLoad()
        setupUI()
    }
}

// MARK: - Private Methods
extension ToastViewController {
    private func setupUI() {
        navigationItem.title = "ログリスト"

        tableView.dataSource = self
        tableView.delegate = self
        view.addSubview(tableView)
        tableView.translatesAutoresizingMaskIntoConstraints = false
        tableView.topAnchor.constraint(equalTo: topLayoutGuide.bottomAnchor).isActive = true
        tableView.leadingAnchor.constraint(equalTo: view.leadingAnchor).isActive = true
        tableView.trailingAnchor.constraint(equalTo: view.trailingAnchor).isActive = true
        tableView.bottomAnchor.constraint(equalTo: bottomLayoutGuide.topAnchor).isActive = true
    }
}

// MARK: - UITableViewDataSource
extension ToastViewController: UITableViewDataSource {
    func tableView(_ tableView: UITableView, numberOfRowsInSection section: Int) -> Int {
        return ToastView.shared.logs.reversed().count
    }

    func tableView(_ tableView: UITableView, cellForRowAt indexPath: IndexPath) -> UITableViewCell {
        guard let cell = tableView.dequeueReusableCell(withIdentifier: ToastTableViewCell.className, for: indexPath) as? ToastTableViewCell else {
            fatalError("ToastTableViewCell is not found.")
        }
        let log: (body: String, createdAt: String) = ToastView.shared.logs.reversed()[indexPath.row]
        cell.dateLabel.text = log.createdAt
        cell.bodyLabel.text = log.body
        return cell
    }
}

// MARK: - UITableViewDelegate
extension ToastViewController: UITableViewDelegate {}
final class ToastTableViewCell: UITableViewCell {
    internal let dateLabel: PaddingLabel = {
        let label = PaddingLabel()
        label.backgroundColor = UIColor.gray
        label.font = UIFont.systemFont(ofSize: 14)
        label.textColor = UIColor.white
        label.numberOfLines = 1
        label.textAlignment = .left
        return label
    }()

    internal let bodyLabel: PaddingLabel = {
        let label = PaddingLabel()
        label.backgroundColor = UIColor.white
        label.font = UIFont.systemFont(ofSize: 14)
        label.textColor = UIColor.black
        label.numberOfLines = 0
        label.textAlignment = .left
        return label
    }()

    override init(style: UITableViewCellStyle, reuseIdentifier: String?) {
        super.init(style: style, reuseIdentifier: reuseIdentifier)
        selectionStyle = .none

        addSubview(dateLabel)
        dateLabel.translatesAutoresizingMaskIntoConstraints = false
        dateLabel.topAnchor.constraint(equalTo: topAnchor).isActive = true
        dateLabel.leadingAnchor.constraint(equalTo: leadingAnchor).isActive = true
        dateLabel.trailingAnchor.constraint(equalTo: trailingAnchor).isActive = true
        dateLabel.heightAnchor.constraint(equalToConstant: 25).isActive = true

        addSubview(bodyLabel)
        bodyLabel.translatesAutoresizingMaskIntoConstraints = false
        bodyLabel.topAnchor.constraint(equalTo: dateLabel.bottomAnchor).isActive = true
        bodyLabel.bottomAnchor.constraint(equalTo: bottomAnchor).isActive = true
        bodyLabel.leadingAnchor.constraint(equalTo: leadingAnchor).isActive = true
        bodyLabel.trailingAnchor.constraint(equalTo: trailingAnchor).isActive = true
    }

    required init?(coder aDecoder: NSCoder) {
        fatalError("init(coder:) has not been implemented")
    }
}
ここでポイントなのはreversed()で配列を逆順にして表示してあげることです。
最新のものが上に表示されるようにすると確認がしやすくなります。
最後に
削除/追加 機能があれば、削除用にコードを埋め込んでビルドをし直したり データを追加するために同じ操作を繰り返すようなこともなくなるので スムーズに開発を行うことができます。
ログ表示に関しても、具体的なエラー内容が知れると対応がとてもしやすいです。
行動ログもこのタイミングでこのデータがほしいということがより具体的にわかるようになりました。
このような補助系の実装は後回しになりがちですが、 紹介した機能を活用することで、開発速度があがることは間違いなしです。
今回は実際のコードも紹介していますので、是非活用してください。
エンジニアを募集しています
LCLではエンジニア積極的に募集中です。
興味のある方はお気軽にご連絡よろしくお願いいたします。
インターンも募集しています。