はじめに
この記事はLCL Advent Calendar 2020 - 24日目です。
リモートワークと外出自粛の組み合わせにより年の瀬をあまり感じていないバックエンドエンジニアの星野です。
LCLではAmazon ECSを活用しています。 その中でAmazon API GatewayのHTTP APIと組み合わせて使う機会があったので紹介したいと思います。
はじめにHTTP APIとREST APIの違い、それによるVPCリンクの挙動違いについてはクラスメソッドさんの記事によくまとまっていましたので参考にしてください。 dev.classmethod.jp dev.classmethod.jp
システム構成図
システム構成図は次のようになります。
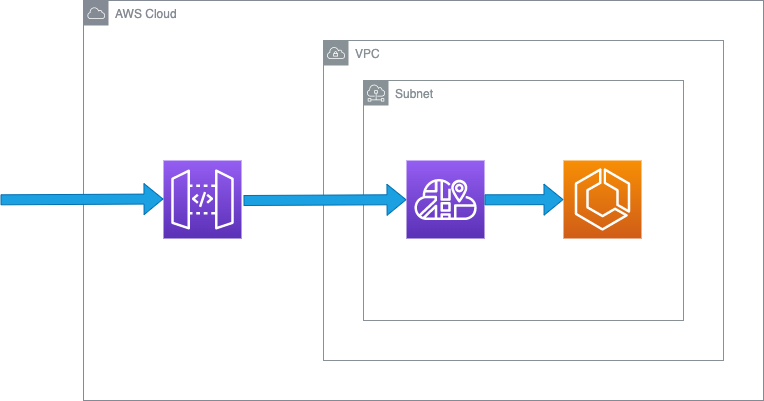
外側からAPI Gateway、ECSサービスディスカバリ(Cloud Map)、ECSです。
ALBと比較した際のメリット
ECSを使って外部にサービスを公開したい場合はALBがよく使われていると思いますが、今回ALBと比較してなぜAPI Gateway HTTP APIを採用したのかを解説します。
- リクエスト数課金のため、リクエストが数が少ない場合作成した時点で時間単位の課金も発生するALBと比べて安価になる
- どちらもOpenID Connectによる認証が使えるが、API GatewayはAmplify Libraryを使うことでフロントエンドの実装工数を削減できる
- IAM認証を使うことでCognito User PoolsのグループでAPIエンドポイントアクセスを制限できる
- Cross-Origin Resource Sharingの仕組みがビルトインされているのでECS側でハンドリングする必要がない
ECSからは離れますがAWSサービスとの統合も使い勝手が良いですね。
デメリットとしてはセキュリティグループやWAFを紐づけることができないことによるIP制限やエンドポイントの保護使えないことが挙げられます*1
Terraformで実装してみる
LCLではTerraformによるインフラのコード化を推進していますので、上記構成をTerraformで作成する際のポイントを解説して行きます。
サンプルコード全体
※このコードは説明の簡略化ために多くのリソースを省略しているのでそのままterraform applyできません。
また、チーム開発においてresourceにつける名前を全てthisにするのは止めましょう。
data "aws_vpc" "this" {
  tags = {
    Name = "awesome-vpc"
  }
}

resource "aws_service_discovery_private_dns_namespace" "this" {
  name = "private.example.com"
  vpc  = data.aws_vpc.this.id
}

resource "aws_service_discovery_service" "this" {
  name = "great-service-discovery"

  dns_config {
    namespace_id = aws_service_discovery_private_dns_namespace.this.id

    dns_records {
      ttl  = 60
      type = "SRV"
    }

    routing_policy = "MULTIVALUE"
  }

  health_check_custom_config {
    failure_threshold = 1
  }
}

resource "aws_ecs_service" "this" {
  中略
  service_registries {
    registry_arn = aws_service_discovery_service.this.arn
    port         = 80
  }
}

resource "aws_apigatewayv2_api" "this" {
  name          = "crazy-api"
  protocol_type = "HTTP"
}

resource "aws_apigatewayv2_deployment" "this" {
  api_id = aws_apigatewayv2_api.this.id

  lifecycle {
    create_before_destroy = true
  }
}

resource "aws_apigatewayv2_stage" "this" {
  api_id        = aws_apigatewayv2_api.this.id
  name          = "$default"
  auto_deploy   = true
  deployment_id = aws_apigatewayv2_deployment.this.id

  lifecycle {
    ignore_changes = [deployment_id, default_route_settings]
  }
}

resource "aws_apigatewayv2_route" "this" {
  api_id    = aws_apigatewayv2_api.this.id
  route_key = "$default"
  target    = "integrations/${aws_apigatewayv2_integration.this.id}"
}

resource "aws_apigatewayv2_vpc_link" "this" {
  name               = "fine-vpc-link"
  security_group_ids = ["security_group_ids"]
  subnet_ids         = ["subnet_ids"]
}

resource "aws_apigatewayv2_integration" "this" {
  api_id             = aws_apigatewayv2_api.this.id
  integration_type   = "HTTP_PROXY"
  connection_type    = "VPC_LINK"
  connection_id      = aws_apigatewayv2_vpc_link.this.id
  integration_method = "ANY"
  integration_uri    = aws_service_discovery_service.this.arn
}
ECSサービスディスカバリ
resource "aws_service_discovery_private_dns_namespace" "this" {
  name = "private.example.com"
  vpc  = data.aws_vpc.this.id
}

resource "aws_service_discovery_service" "this" {
  name = "great-service-discovery"

  dns_config {
    namespace_id = aws_service_discovery_private_dns_namespace.this.id

    dns_records {
      ttl  = 60
      type = "SRV"
    }

    routing_policy = "MULTIVALUE"
  }

  health_check_custom_config {
    failure_threshold = 1
  }
}
ECSサービスディスカバリを使う場合はdns_recordsをtype = "SRV"にしてhealth_check_custom_configを設定します。
ECSサービス
resource "aws_ecs_service" "this" {
  中略
  service_registries {
    registry_arn = aws_service_discovery_service.this.arn
    port         = 80
  }
}
service_registriesのブロックで設定します。
タスク定義やサブネットなどは本題ではないので省略しています。
API Gatewayのデフォルトルート
resource "aws_apigatewayv2_deployment" "this" {
  api_id = aws_apigatewayv2_api.this.id

  lifecycle {
    create_before_destroy = true
  }
}

resource "aws_apigatewayv2_stage" "this" {
  api_id        = aws_apigatewayv2_api.this.id
  name          = "$default"
  auto_deploy   = true
  deployment_id = aws_apigatewayv2_deployment.this.id

  lifecycle {
    ignore_changes = [deployment_id, default_route_settings]
  }
}

resource "aws_apigatewayv2_route" "this" {
  api_id    = aws_apigatewayv2_api.this.id
  route_key = "$default"
  target    = "integrations/${aws_apigatewayv2_integration.this.id}"
}
HTTP APIは$defaultのルートを設定することでリクエストのフルパスをそのまま統合先に送信できます。
ECSと組み合わせる際はデフォルトルートを使うことでシンプルに実装できました。*2
VPCリンク
resource "aws_apigatewayv2_vpc_link" "this" {
  name               = "fine-vpc-link"
  security_group_ids = ["security_group_ids"]
  subnet_ids         = ["subnet_ids"]
}

resource "aws_apigatewayv2_integration" "this" {
  api_id             = aws_apigatewayv2_api.http_api.id
  integration_type   = "HTTP_PROXY"
  connection_type    = "VPC_LINK"
  connection_id      = aws_apigatewayv2_vpc_link.this.id
  integration_method = "ANY"
  integration_uri    = aws_service_discovery_service.this.arn
}
VPCリンクを設定する際はaws_apigatewayv2_integrationでintegration_type = "HTTP_PROXY"でintegration_method = "ANY"にするのが重要です。
まとめ
API Gatewayと聞くとLambdaの印象が強いですが、ECSとの組み合わせでも強力な機能を活用できました。
上記開発中はAWSとTerraformのドキュメントを何度も読み返しながら試行錯誤の連続でしたので、この記事が誰かのお役に立てると幸いです。